n8n Graphical Input Template - AI Agent Interface
A beautiful, ready-to-use HTML interface for n8n workflows that allows your users to interact with AI agents through a clean web UI. No frontend skills required!


🎯 Why Use This Template?
- No Frontend Skills Required : Get a professional interface without writing React, Vue, or complex JavaScript
- Real-Time AI Responses : Display AI responses directly in the interface with loading animations
- User-Friendly : Your clients get a beautiful UI instead of dealing with APIs or command-line tools
- Plug & Play: Just paste the code in an n8n Code node and connect your AI agents
- Fully Customizable : Easy to modify colors, add more agents, or change the layout
- Dark/Light Mode : Built-in theme toggle with localStorage persistence
🚀 When to Use This?
Perfect for:
- AI Agent Interactions : Let users chat with different specialized AI agents (Database, Web Search, RAG)
- Customer Support : Route customer questions to appropriate AI assistants
- Data Collection : Gather information from clients with instant AI-powered responses
- Customer Portals : Create simple interfaces for customers to interact with your AI automations
- Internal Tools : Build quick admin panels with AI assistance
📦 What's Included?
- ✅ Text Input Area : Large textarea for user messages
- ✅ Send Button : Main action button with smooth animations
- ✅ 4 Specialized Agent Buttons : Pre-configured for General, Database, Web, and RAG agents
- ✅ AI Response Display : Beautiful response area with agent badges and loading states
- ✅ Project Guide Modal : Built-in documentation for your users
- ✅ Theme Toggle : Dark/Light mode with localStorage persistence
- ✅ Responsive Design : Works perfectly on desktop, tablet, and mobile
- ✅ Font Awesome Icons : Beautiful icons throughout the interface
- ✅ Error Handling : Graceful error messages if something goes wrong
🛠️ How to Use
Part 1: Display the Interface
Create a 3-node workflow to show the UI:
Webhook (GET) → Code Node → Respond to Webhook
Configuration:
-
Webhook Node (GET) :
- Method: GET
- Path:
/your-interface (e.g., /ai-chat)
- Authentication: Optional
-
Code Node :
- Copy the entire content of
main.js
- Paste it into the Code field
-
Respond to Webhook :
- Respond With: First incoming item
- Response Data Source: Binary
- Binary Property:
data
Part 2: Process AI Requests
Create a separate workflow to handle AI processing:
Webhook (POST) → Switch → AI Agents → Code Node → Respond to Webhook
Configuration:
-
Webhook Node (POST) :
- Method: POST
- Path:
/webhook-endpoint
- Response Mode: "Respond to Webhook"
-
Switch Node - Route by agent type:
- Rule 1:
{{ $json.body.agent_type }} equals general
- Rule 2:
{{ $json.body.agent_type }} equals database
- Rule 3:
{{ $json.body.agent_type }} equals web
- Rule 4:
{{ $json.body.agent_type }} equals rag
-
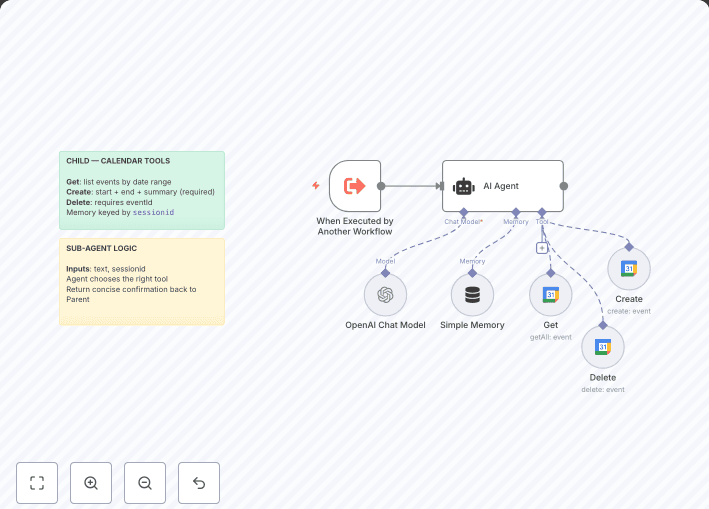
AI Agent Nodes (4 nodes, one per agent type):
- Connect one AI Agent to each Switch output
- Configure with OpenAI, Anthropic, or local LLM
- Add tools, memory, system prompts as needed
-
Code Node - Format the response:
const webhookData = $('Webhook').first().json.body;
const aiResponse = $input.first().json;

return [{
  json: {
    response: aiResponse.output || aiResponse.text || aiResponse.response,
    agent_type: webhookData.agent_type,
    user_message: webhookData.message,
    timestamp: new Date().toISOString()
  }
}];
- Respond to Webhook - Send back the formatted response
🔧 What to Update
In main.js
Line 847 - Update webhook URL to match your n8n path:
const WEBHOOK_URL = '/webhook/webhook-endpoint';
Line 20 - Customize project name:
const projectName = "AI Assistant Hub";
Lines 34-56 - Change colors (optional):
:root {
  --primary: #6366f1;        /* Main accent color */
  --primary-hover: #4f46e5;  /* Hover state */
  --background: #ffffff;     /* Background */
}
📊 How It Works
User visits /your-interface
    ↓
Sees the chat interface
    ↓
Types message + clicks agent button
    ↓
POST to /webhook/webhook-endpoint
{
  "message": "Find users in database",
  "agent_type": "database",
  "timestamp": "2025-10-19T..."
}
    ↓
Switch routes to Database AI Agent
    ↓
AI Agent processes with tools/memory
    ↓
Code Node formats response
    ↓
Returns { "response": "Found 10 users..." }
    ↓
Interface displays response with badge + animation
🎨 Customization Guide
Add More Agents
Copy an agent card (lines ~700-730) and modify:
<div>
  <div>
    <i></i>
  </div>
  <div>Custom AI Agent</div>
  <div>
    Specialized in your custom task.
  </div>
</div>
Then add CSS for the new agent type:
.agent-card.custom-agent::before { background: #f59e0b; }
.agent-card.custom-agent:hover { border-color: #f59e0b; }
.agent-icon.custom-icon { background: linear-gradient(135deg, #f59e0b, #d97706); }
.response-agent-badge.custom-badge {
  background: rgba(245, 158, 11, 0.1);
  color: #f59e0b;
}
And update the Switch node to handle the new agent type!
Modify Text Content
- Modal Guide : Lines ~754-810 - Update help text
- Placeholder : Line ~689 - Change textarea placeholder
- Subtitles : Lines ~677, ~693 - Modify section descriptions
Change Agent Descriptions
Lines ~705, ~717, ~729 - Update the description text for each agent.
📱 Built-in Features
- Enter to Send : Press Enter to send (Shift+Enter for new line)
- Escape to Close : Press Esc to close modals
- Loading State : Animated spinner while AI processes
- Agent Badges : Color-coded badges show which agent responded
- Clear Button : Easily clear responses to start fresh
- Theme Persistence : Theme choice saved in browser
- Smooth Animations : Professional transitions and hover effects
- Error Handling : User-friendly error messages
💡 Example Workflow Ideas
Customer Support Bot
- General Agent : Answers common questions
- Database Agent : Looks up order status, account info
- Web Agent : Searches knowledge base articles
- RAG Agent : Searches company documentation
Data Analysis Tool
- General Agent : Explains data concepts
- Database Agent : Runs SQL queries on your data
- Web Agent : Fetches external data sources
- RAG Agent : Searches analysis reports
Internal Admin Panel
- General Agent : General assistance
- Database Agent : User management queries
- Web Agent : Check external integrations
- RAG Agent : Search internal docs/wikis
🐛 Troubleshooting
Response not displaying?
- Check that Code Node after AI Agent formats response with
response field
- Verify webhook URL in
main.js matches your n8n webhook path
- Check browser console for JavaScript errors
AI Agent not responding?
- Ensure Switch node routes match agent types:
general, database, web, rag
- Verify AI Agent nodes are properly configured with API keys
- Check n8n execution logs for errors
Styling issues?
- Clear browser cache
- Check that Font Awesome CDN is loading
- Verify CSS variables are properly defined
📝 Technical Details
- Framework : Pure HTML/CSS/JavaScript (no dependencies!)
- Icons : Font Awesome 6.4.0
- Browser Support : All modern browsers (Chrome, Firefox, Safari, Edge)
- Mobile : Fully responsive with touch support
- File Size : ~1050 lines (~35KB minified)
🤝 Contributing & Support
This template is designed to be simple and self-explanatory. The code structure:
- Lines 1-23 : Configuration and setup
- Lines 24-640 : CSS styles
- Lines 641-751 : HTML structure
- Lines 752-1048 : JavaScript functions
Feel free to modify and adapt to your needs!
📝 License
Free to use and modify for your n8n workflows. No attribution required.